¶ Salesforce Hierarchy
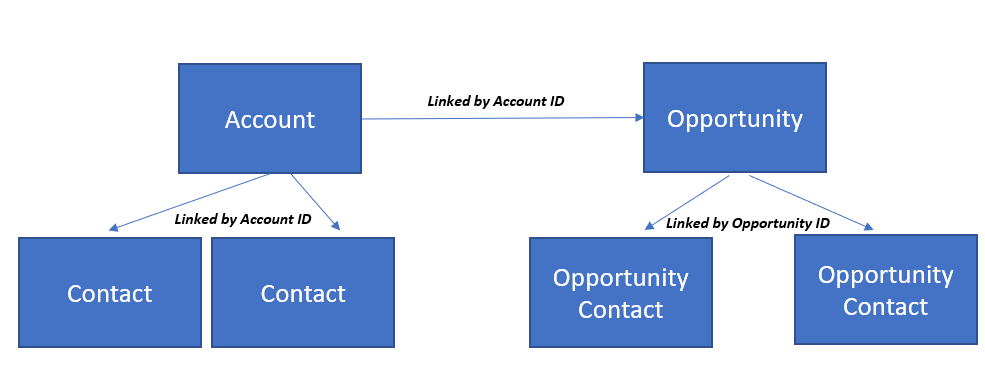
¶ Accounts
An account is any entity that exists. It could be an insurance carrier, an insurance agency, a potential customer, etc. Each account has it's own unique Account ID.
¶ Opportunities
An opportunity is created for potential customers and is linked to the account with it's unique Account ID.
¶ Contact
Each account can have multiple contacts. Contacts are linked to accounts with the unique Account ID. A contact cannot be linked to more than one account.
¶ Opportunity Contact
Each opportunity can have multiple opportunity contacts. An opportunity contact could be a customer contact, an insurance agent, an underwriter, a loss control rep, etc. Opportunity contacts are linked to opportunities with the unique Opportunity ID. A contact can be turned into multiple opportunity contacts that are linked to different opportunities.
¶ Salesforce Bulk Uploads
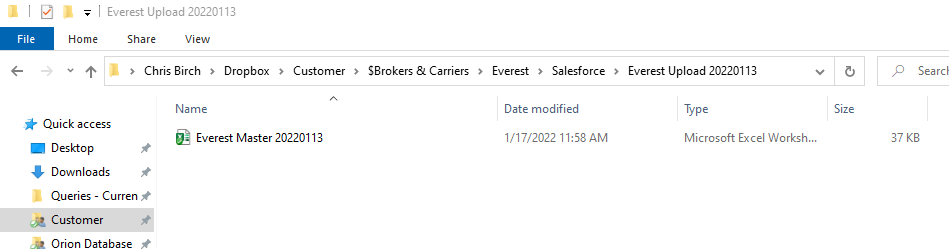
- Create a new folder in the respective Dropbox folder and save the excel file in that folder
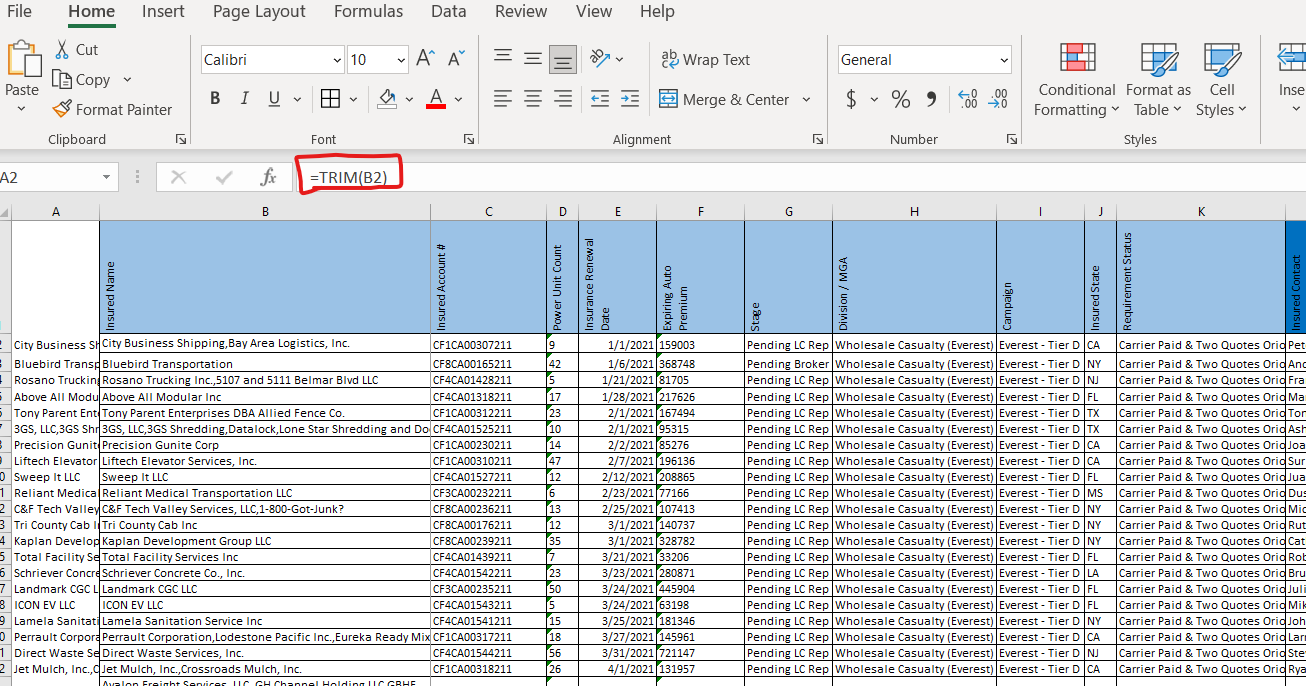
2. Next, some data cleanup needs to be done in the excel file. First, all a blank column to use the TRIM function to remove all leading and trailing spaces from each column. This is necessary for VLOOKUP functions that will be used later. Copy/Paste the results of the TRIM function as values in the corresponding columns. Below, we would copy everything from column A and paste as values in column B. Again, this needs to be done for all columns.
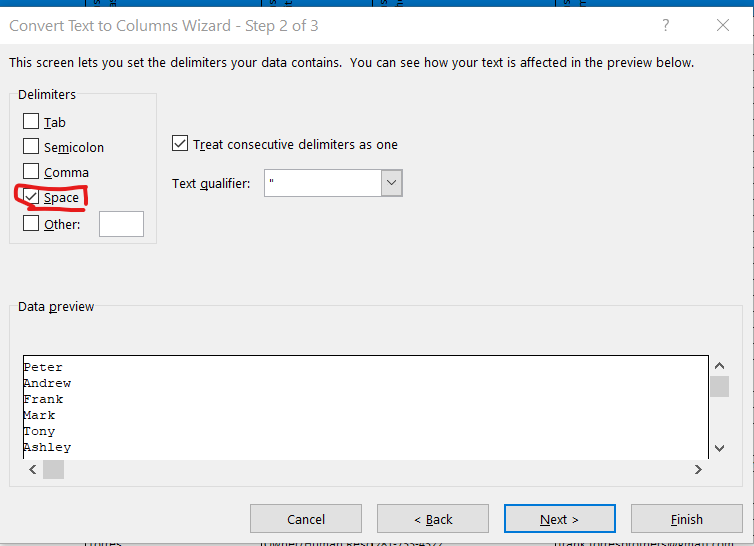
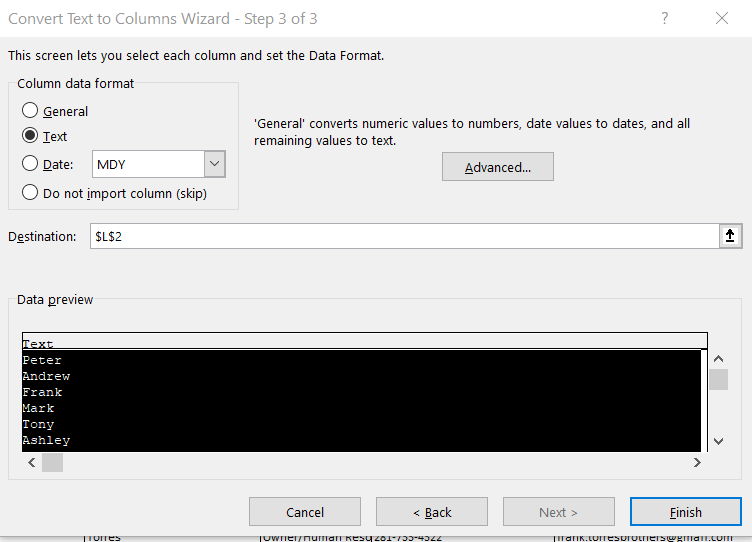
3. Next, all names need to be split out from one column into two (first name and last name). Make sure each name is only separated by one space between the first and last name (remove middle initials, combine multi-word first/last names to remove a space or add a hyphen). Add a blank column to the right of the current name column. Click the Data tab and select Text to Columns. Check “Delimited” and click Next. Check “Space” and click Next. Set column data format to General for all columns (must click on each column individually). Click finish. Visually verify that we now have data in a First Name column and a Last Name column. Repeat for all columns with names in them.
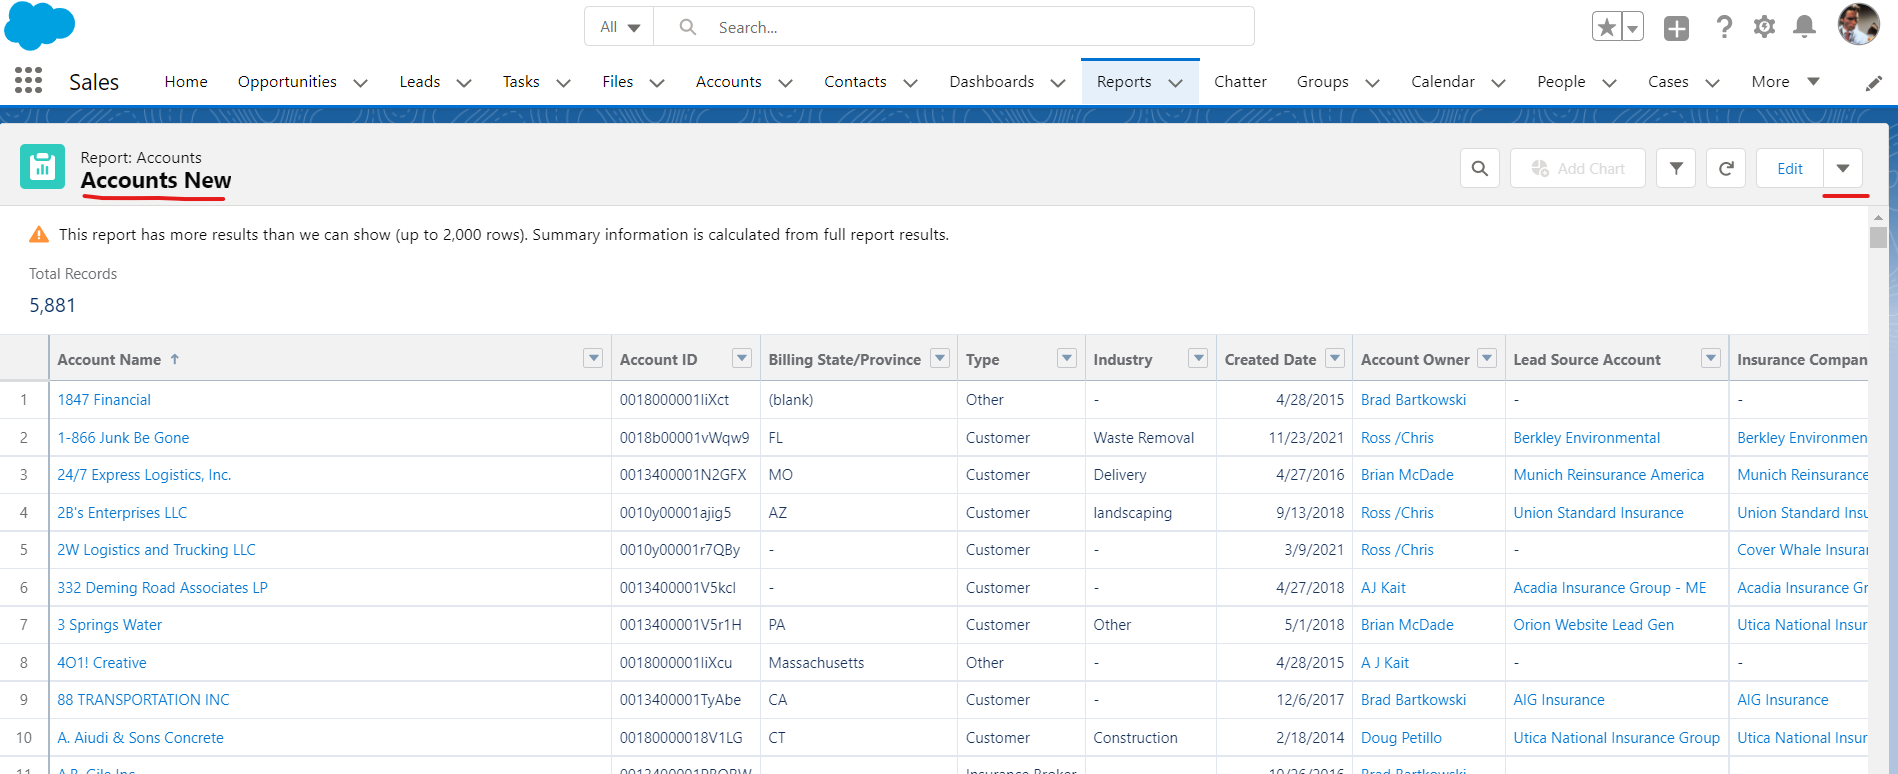
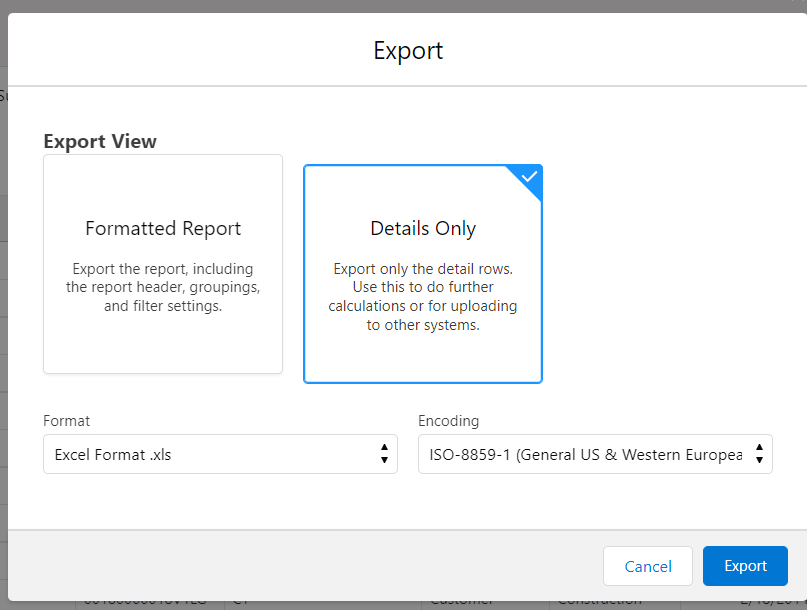
4. Next, we need to pull existing Salesforce reports into the Excel file to see what is already in Salesforce. In Salesforce, select Reports → Accounts New. Click the dropdown in the top right corner of the report and click Export. Select “Details Only”, set the Format to Comma Delimited .csv and click Export.
5. Open the export and copy/paste all data into a new tab in the file. Click Insert → Table and make sure all data is selected. Name the table “Accounts”

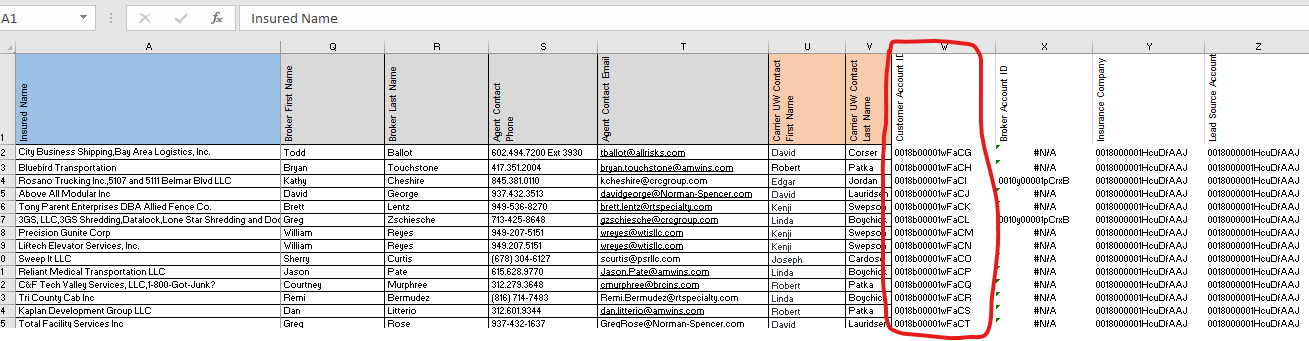
6. Navigate back to the main tab and use the VLOOKUP function to find any accounts that already are in Salesforce based on a name match. Here is a sample formula: =VLOOKUP(A2,Accounts,2,0)
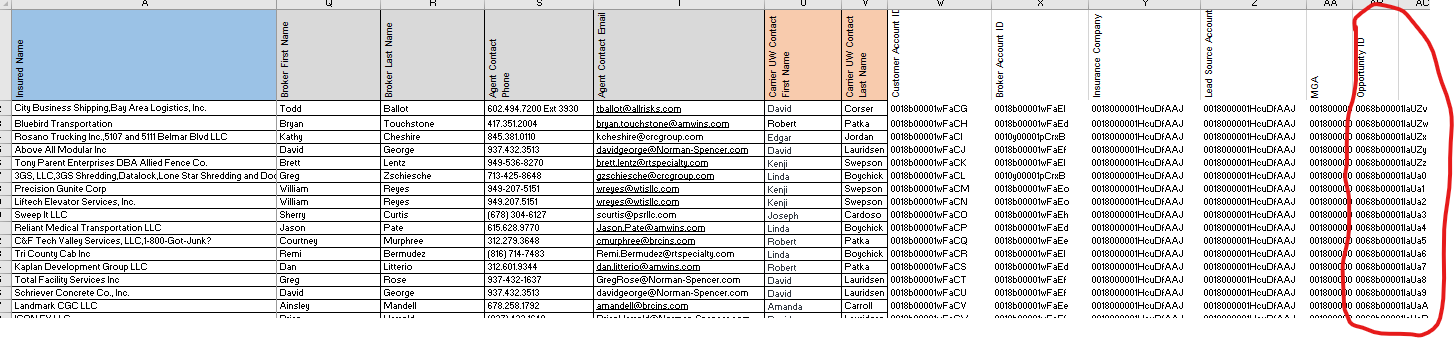
In the image below, column W uses the VLOOKUP function to search for the contents of A2 in the Accounts table. If an exact match is found, it will return the value in column B of the Accounts table

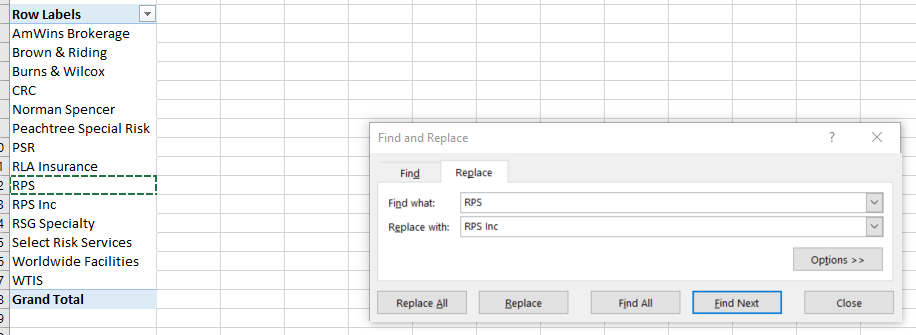
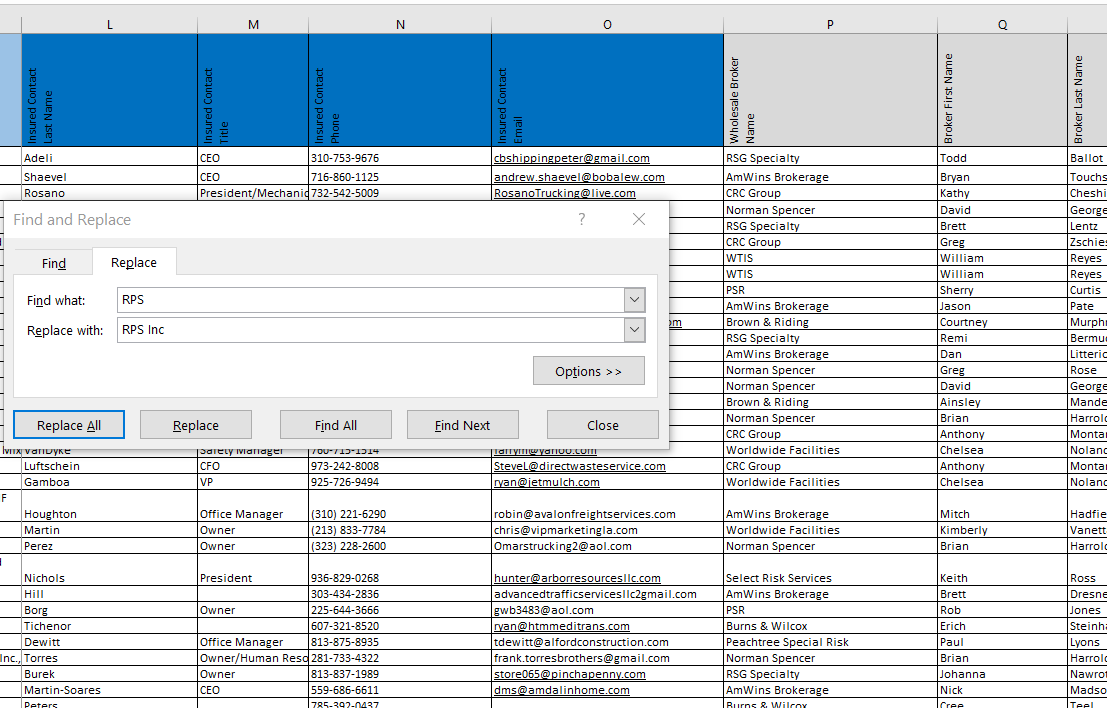
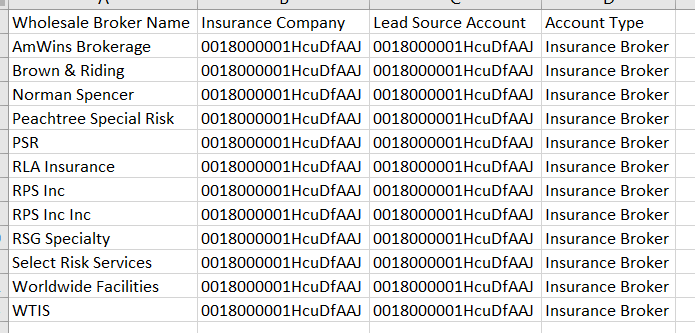
7. Create a pivot table with the Broker Name to find duplicate brokers that are listed under multiple names. In the example below, you can see that both “RPS” and “RPS Inc” were listed as brokers in the base dataset. I replaced all cells in column P that had “RPS” with “RPS Inc". Be sure to only select the columns you want to replace data in before clicking Replace All.
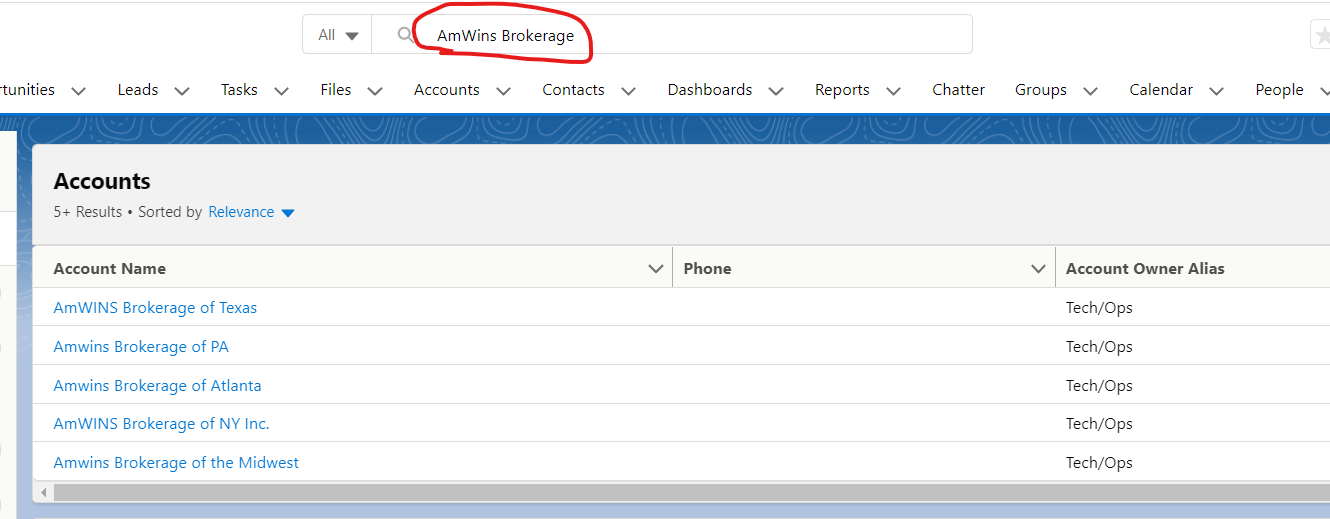
8. In Salesforce, search for each broker name to see if an account already exists with a slightly different name. If so, change the broker name in the base dataset to match the existing account name in Salesforce.
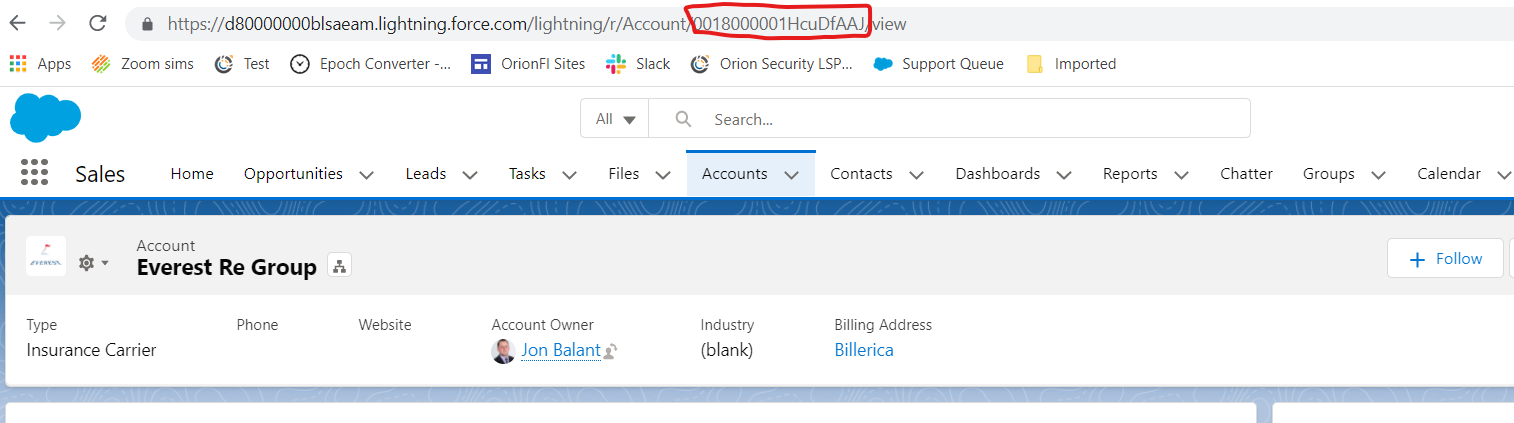
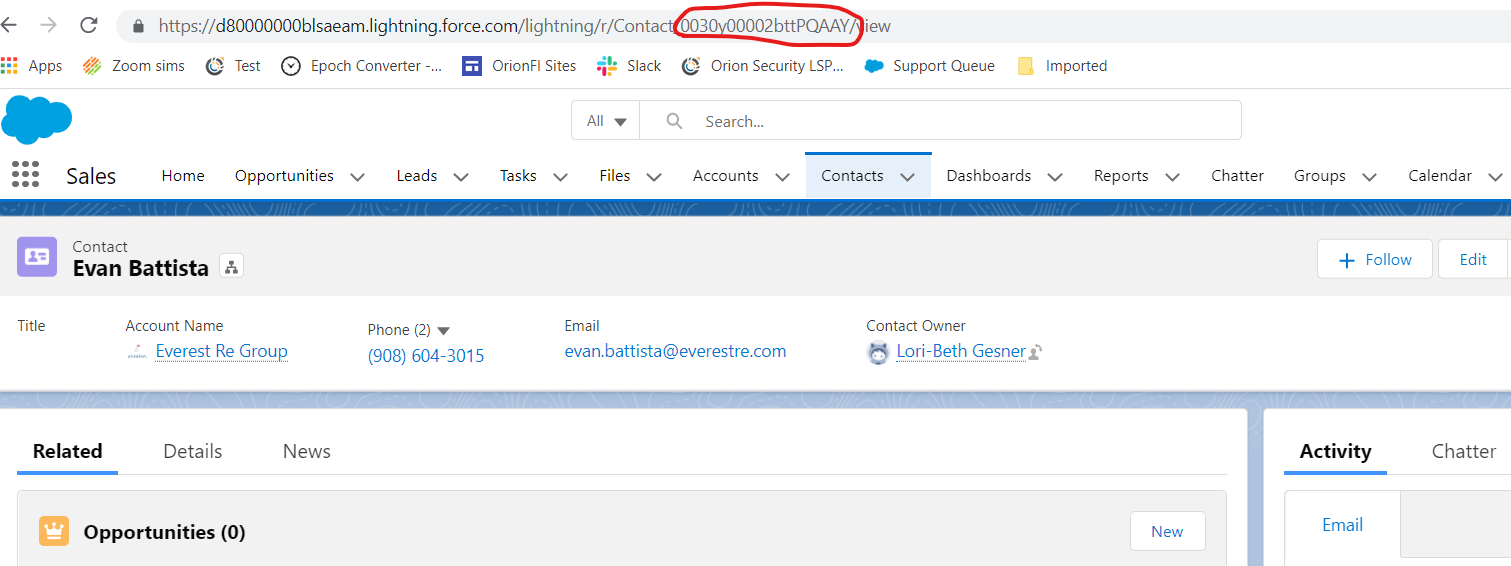
9. Add two additional columns to the main data sheet named “Lead Source Account” and “Insurance Company”. In Salesforce, search for the name of the carrier then click on the account for the carrier. Copy/Paste their Account ID from the Salesforce URL. Enter the Account ID as the lead source account and insurance company for every row.

10. Once the base dataset is cleaned up, it is time to start bulk uploading the data into Salesforce. This is done with the free dataloader.io tool. The following uploads need to occur:
- Customer Account
- Broker Account
- Customer Opportunity
- Customer Contact
- Broker Contact
- Customer Opportunity Contact
- Broker Opportunity Contact
- Underwriter Opportunity Contact
11. To Bulk Upload the Customer Accounts, copy/paste the following columns into a new tab named Customer Account Upload. Copy/Paste all of this data into a new .csv file and save it as “Customer Account Upload (date)”. Add an additional column named Account Type and set it to Customer for all rows. Save it in the same dropbox folder that hosts the base datasets.
- Insured Name
- Account Number
- Expiring Premium
- State
- Insurance Company
- Lead Source Account
- Account Type
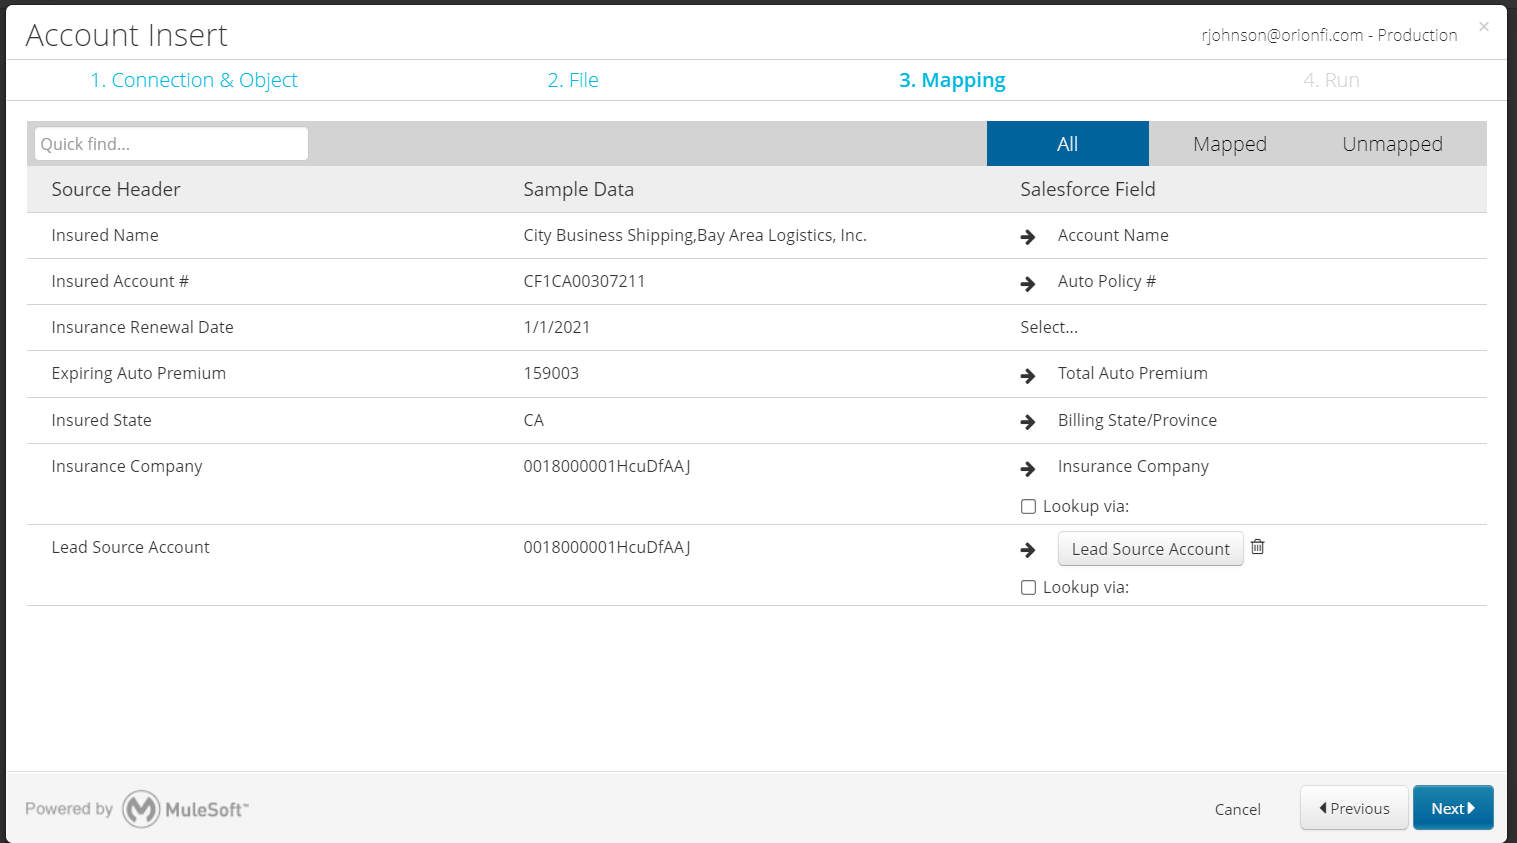
12. Log into the https://dataloader.io/ tool, click New Task, Import. Select Insert and Account and click Next. Upload the .csv file you saved with the following mappings (these can vary based on the source file):
- Insured Name = Account Name
- Insured Account # = Auto Policy #
- Expiring Auto Premium = Total Auto Premium
- Insured State = Billing State/Province
- Insurance Company = Insurance Company
- Lead Source Account = Lead Source Account
- Account Type = Account Type
13. Click Next → Save and Run → Run. Click on the spinning gear to update the status. It will eventually give confirmation that everything was loaded or give errors for things that weren't loaded. For errors, click on the error link to download the file that will detail the errors. Correct the errors and reupload the data that failed to load the first time.

13. In Salesforce, rerun the Accounts New report, export it as a .csv file, copy/paste all data the replace the data in the Accounts table in the excel file. Go back to the main dataset to verify that the VLOOKUP function has found an Account ID for each account that was just uploaded.
14. Create a pivot table with the following fields:
- Broker Name
- Insurance Company
- Lead Source Account
- Broker Account ID
Filter out brokers that are already in Salesforce. Turn Subtotal off, turn Grand Totals off, set Report Layout to Show in Tabular Form. Copy/Paste the Broker Name, Insurance Company and Lead Source Account into a new .csv file and save it in the same dropbox folder named “Broker Account Upload (date)”. Add an additional column named Account Type and tag each row as Insurance Broker.
15. Run the Broker Account through the dataloader.io tool.

16. In Salesforce, rerun the Accounts New report, export it as a .csv file, copy/paste all data the replace the data in the Accounts table in the excel file. Go back to the main dataset to verify that the VLOOKUP function has found an Account ID for each account that was just uploaded.
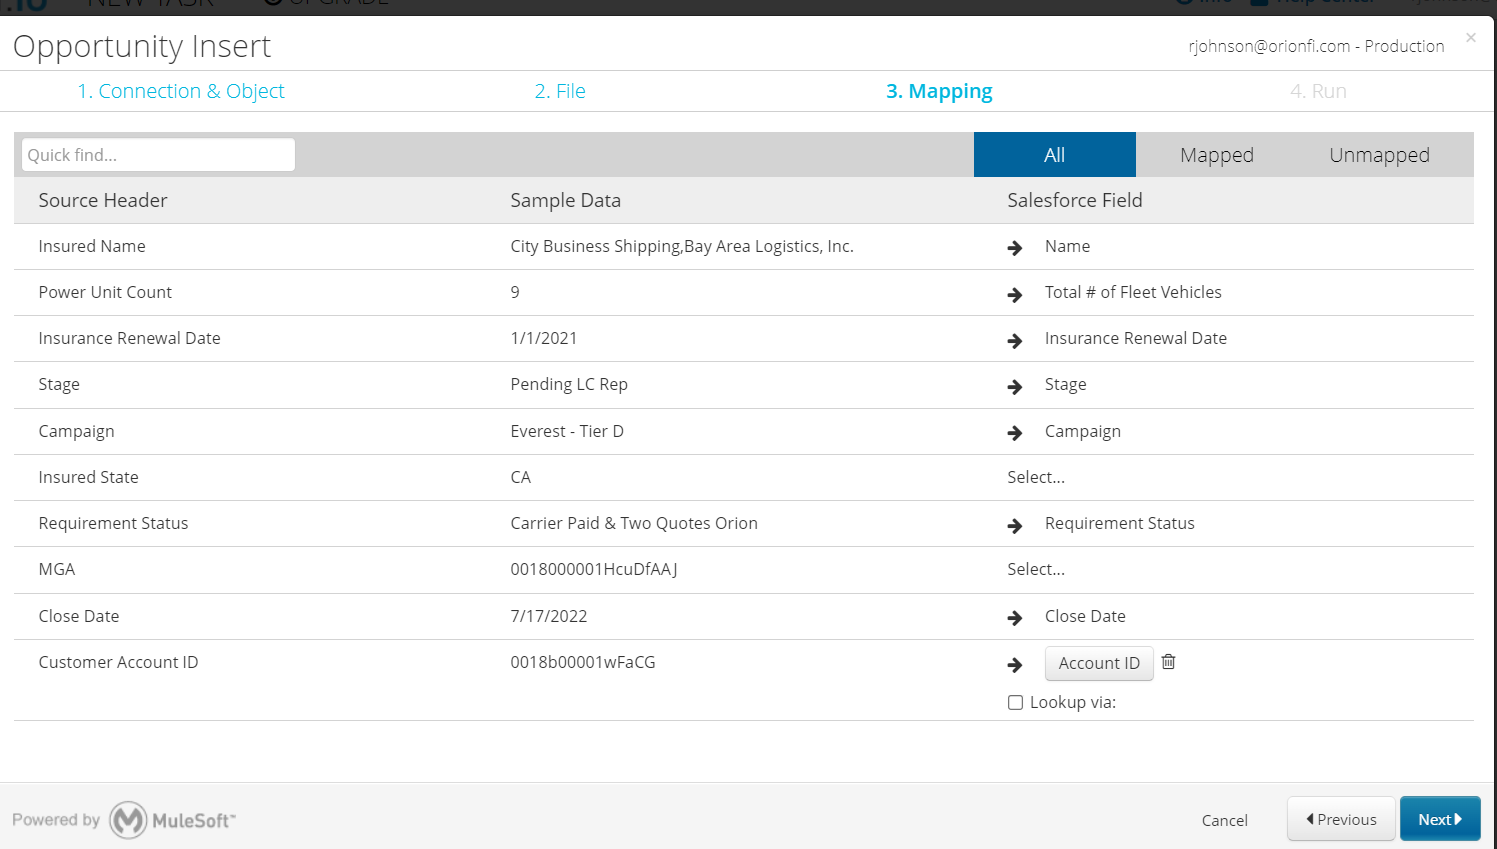
17. Begin the Customer Opportunity Upload process. From the main dataset, copy/paste the following columns into a new tab:
- Insured Name
- Power Units (vehicle count)
- Insurance Renewal Date
- Stage
- Campaign
- Requirement Status
- Customer Account ID
- Add an additional column named Close Date and set the date to 6 months from the current date
18. In Salesforce, run the report named All Opportunities and export it as a .csv file. Copy/paste the data into a new tab in the main data sheet. Click Insert → Table and make sure all data is selected. Name the table “Opportunities”. In the main data tab, add a column for Opportunity ID. Use the VLOOKUP function to find customers that now have an opportunity in Salesforce.
=VLOOKUP(A2,Opportunities,3,0)
19. In Salesforce, run the report named All Contacts and export it as a .csv file. Copy/paste the data into a new tab in the main data sheet. Click Insert → Table and make sure all data is selected. Name the table “Contacts”. In the main data tab, add a column for Customer Contact ID and a column for Broker Contact ID. Use the VLOOKUP function to see if the person is already in Salesforce.
=VLOOKUP(A2,Opportunities,3,0)
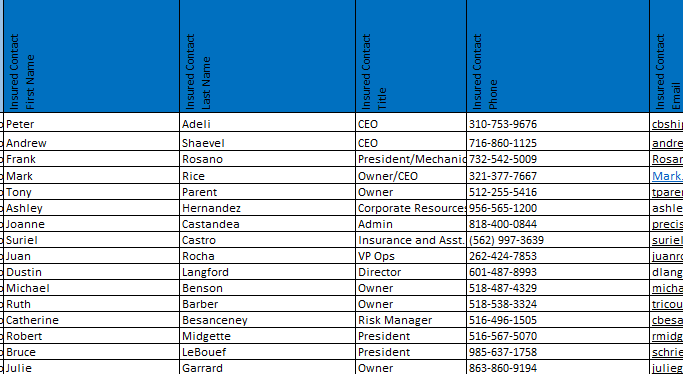
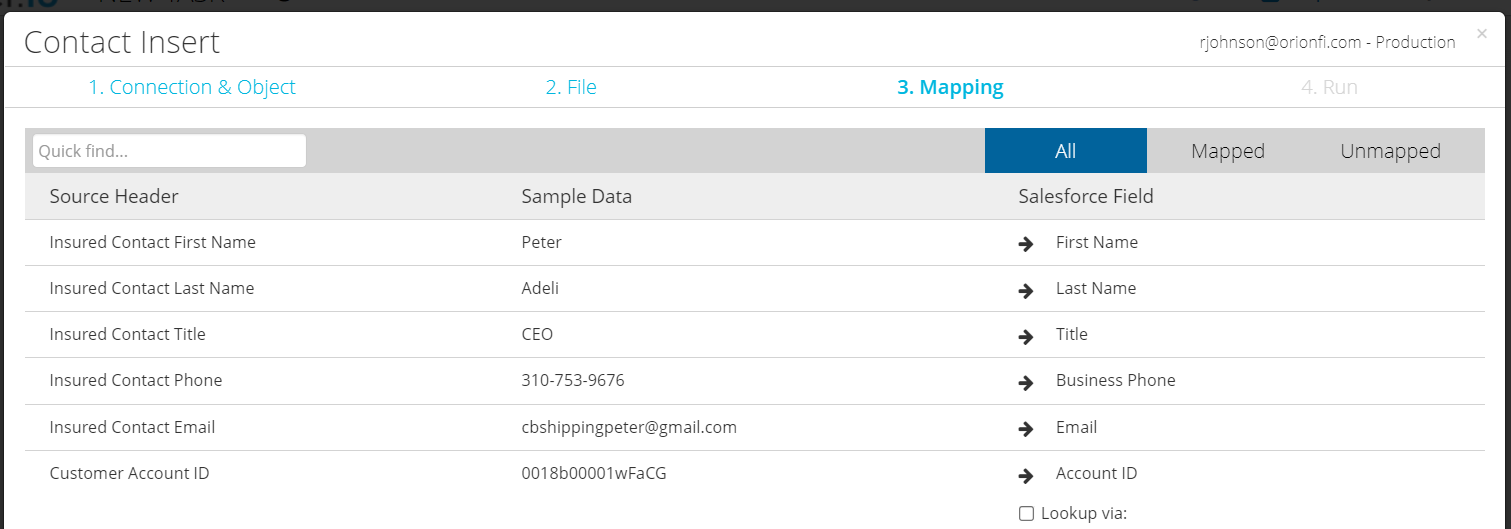
20. Start the Customer Contact upload process. Copy/paste the following columns into a new tab named Customer Contact Upload. Copy/paste from there into a new .csv file named “Customer Contact Upload (date)”
- Insured Contact First Name
- Insured Contact Last Name
- Insured Contact Title
- Insured Contact Email
- Insured Contact Phone
- Customer Account ID
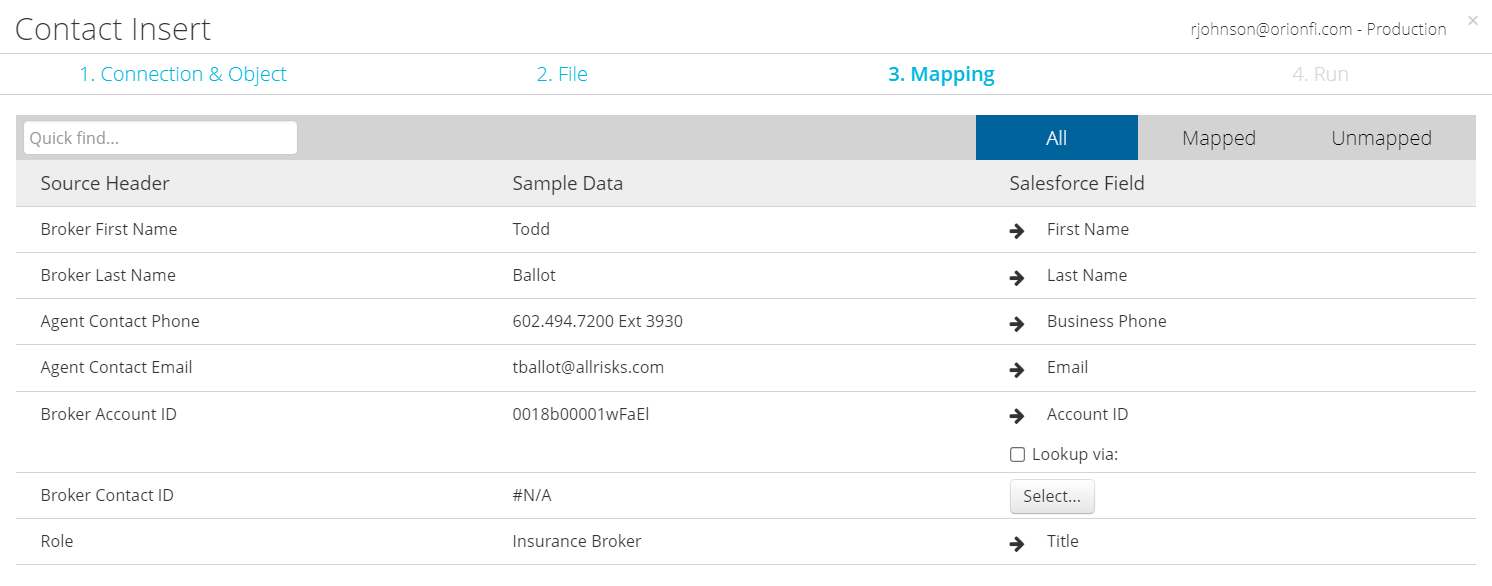
21. Rerun the All Contacts report in Salesforce and copy/paste into the All Contacts tab. Verify that all customer contacts now have a contact ID. Repeat the contact upload process for broker contacts being sure to only upload broker contacts that are not already in Salesforce.
22. Rerun the All Contacts report in Salesforce and copy/paste into the All Contacts tab. Verify that all broker contacts now have a contact ID.
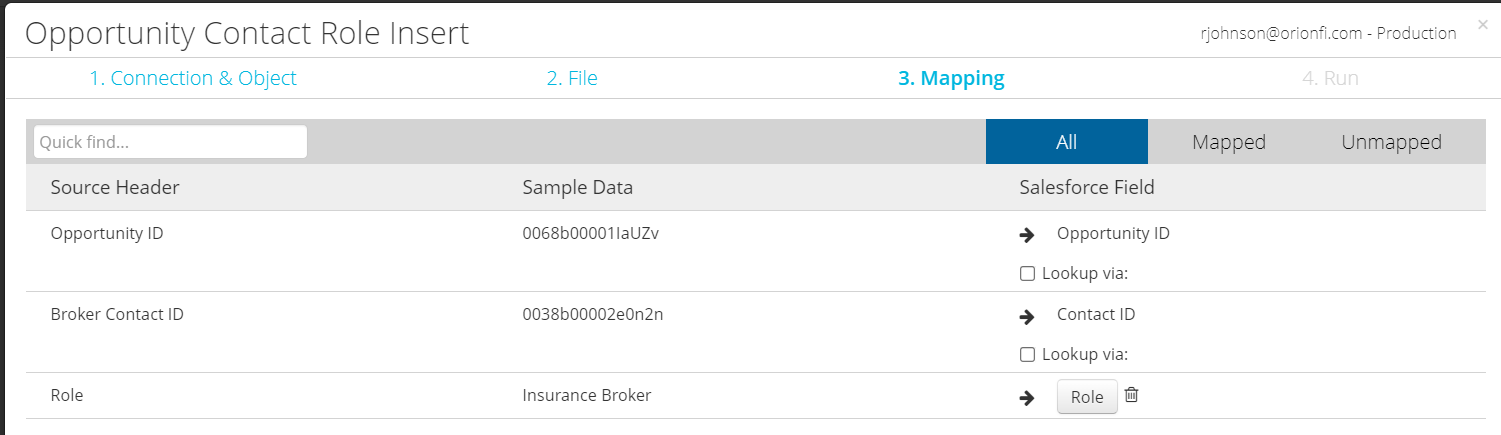
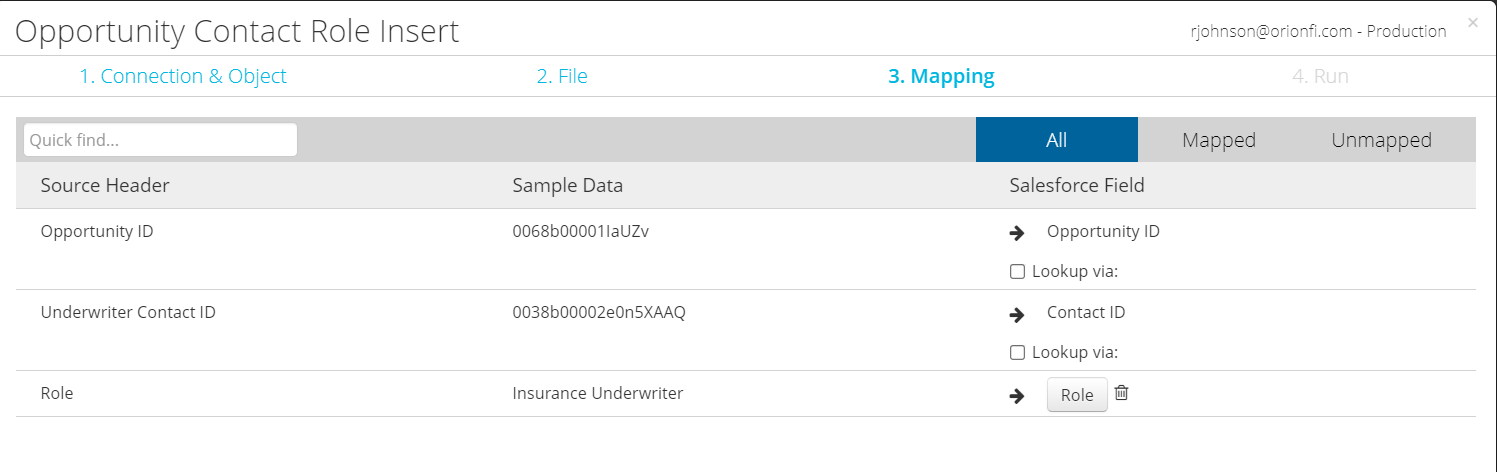
23. Upload the Opportunity Contact Role links between the opportunities and each contact. Copy/Paste the Opportunity ID and Customer Contact ID columns into a new tab. Add a column named Role and enter Primary Meeting Contact (Fleet) for each. Be sure to remove all rows where there is no customer contact to create the link for.
24. Repeat the process for the Broker Opportunity Contact Role upload.
25. Create a new pivot table with the Underwriter First Name, Underwriter Last Name. Turn off subtotals and grand totals. Change Report Layout to Tabular. Search for each person in Salesforce to see if they already exist. Add their contact ID here if they do exist.
26. Repeat the Opportunity Contact Role upload process for all underwriters. First upload the underwriters as contacts if they do not already exist in Salesforce.
27. Search for a few accounts and opportunities in Salesforce to confirm that everything has been uploaded properly.